What's New in PharmaClik Rx 2.0
See below for a list of new features, enhancements, and fixes included in PharmaClik Rx 2.0 or watch the video below.
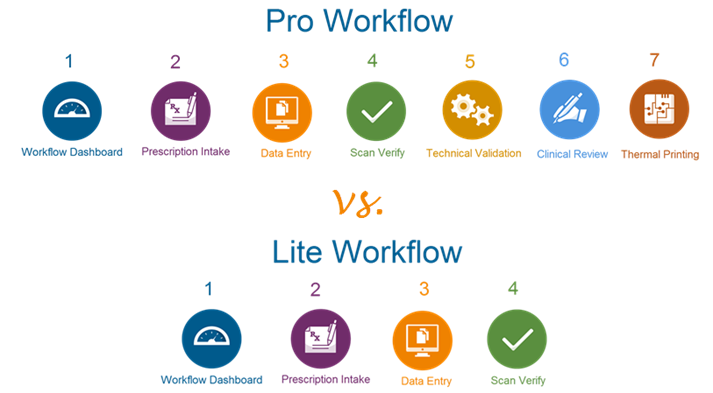
Paperless Workflow
PharmaClik Rx's Paperless Workflow enables pharmacies to track and prioritize prescriptions as they move through the various stages of the filling process. From prescription intake to pick-up, Paperless Workflow manages how prescriptions move through your pharmacy.
The two main types of workflow available are Pro Workflow and Lite Workflow. Pro Workflow enables pharmacies to implement a full paperless workflow solution including Prescription e-Verify and thermal printing, whereas Lite Workflow allows pharmacies to implement a workflow solution while continuing to use laser labels for prescriptions. To learn more, see Introduction to Paperless Workflow.
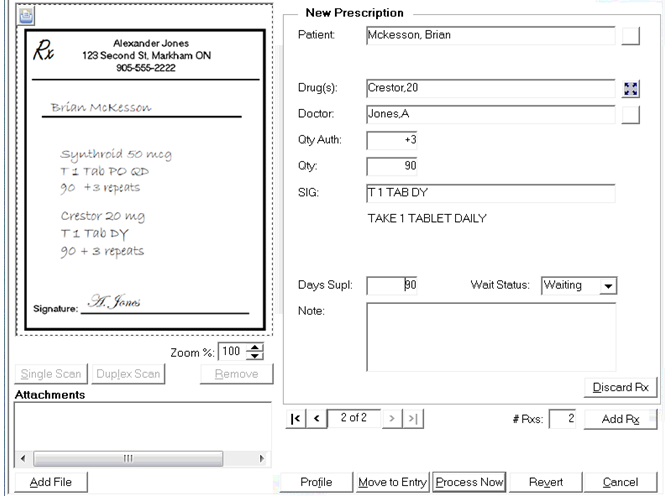
New Prescription Window
The New Prescription window has been enhanced to scan a prescription hard copy. PharmaClik Rx uploads the scanned image within the window, making it easy to enter the prescription information in the appropriate fields (e.g. patient, drug, doctor). In addition, you can also manage multiple prescriptions for one patient within this window by selecting the Add Rx button. For more information, see Creating a New Prescription.
You can also create refills and reauths directly from the New Prescription window. To learn more, see Reauthorizing and Refilling from the New Prescription Window.
New Prescription Preferences (Workflow Preferences)
You can customize settings in the New Prescription window through the Workbench tab in Workflow Preferences (More > Pharmacy) such as determining whether you want the user to be prompted when there is no scanned prescription image or whether all stickies should be saved as prescription notes. To learn more, see Workbench Preferences.
Workbench Buttons - Priority and Grouping
The Priority button from the Workbench has been enhanced to include new wait statuses and a new button called Grouping
  is now available. For more information, see below.
Priority Button - New Wait Statuses Added
The Priority button has been enhanced to include the following wait statuses that you can assign to a waiting prescription depending on the pick-up/delivery time requested by the patient:
- Waiting: Patient is waiting in the pharmacy for the prescription. You can define the wait time for your pharmacy (anywhere between 1 - 59 minutes) in Workflow Preferences. To define the Waiting status, see Workflow Preferences.
- 1 Hour: Patient to pick up their prescription(s) within one hour.
- 4+ Hours: Patient to pick up their prescription(s) within four hours.
- Tomorrow: Patient to pick up their prescription(s) the next day.
- 2-3 Days: Patient to pick up their prescription(s) within 2-3 days.
For more information see, Prioritizing Prescriptions Using Wait Statuses.
You can assign wait statuses from other areas in PharmaClik Rx including the New Prescription Window and Rx Detail. To learn more, see Assigning a Wait Status to a Prescription.
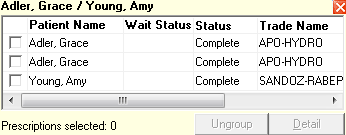
New Grouping Button
The new Grouping button allows you to group multiple patients together, and is visible in the Active Tool Tip window.
To learn more, see Viewing Prescriptions.
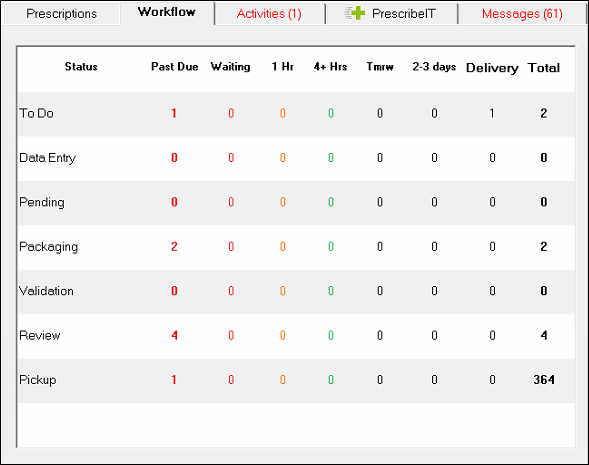
Workbench Workflow Tab
The Workbench has a new tab called Workflow. The Workflow tab is a dashboard that keeps track of prescriptions by wait status as they move through the various stages of the filling process. With the Workflow dashboard, you can monitor and manage waiting prescriptions within each workflow status to ensure they are ready for pick-up when the patient arrives or delivery. To learn more about the Workflow tab and workflow statuses, see Workflow Tab.
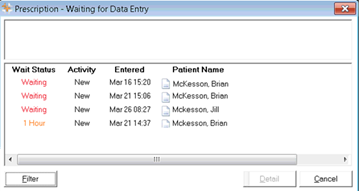
Workflow Work Queue Window
Selecting some workflow status rows in the Workflow tab opens a workflow work queue window where you can filter, sort, and detail prescriptions waiting in a specific workflow status. To learn more, see Workflow Work Queue Windows.
Workflow Statuses - Prescriptions Workbench
The following new workflow statuses have been added to the Prescriptions Workbench:
- Waiting for Data Entry
- Waiting for Packaging
- Waiting for Validation
- Waiting for Review
All workflow statuses are now visible in all tabs of the Prescriptions Workbench (To Do, In Process, Pending, Completed). Each workflow status is colour coded and visible in the Priority column. To learn more see, Workflow Statuses - Prescriptions Workbench.
Workflow Preferences
The Workflow Preferences (More > Pharmacy) window has two new tabs: Workbench and Workflow Status. The new tabs were added to configure and turn on/off preferences for PharmaClik Rx 2.0 features including the New Prescription window, Wait Status and Workflow. To learn more, see Workflow Preferences.
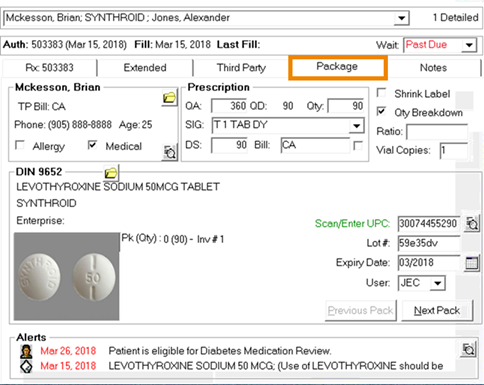
Scan Verify - Package Tab
Scan Verify is a new process added in PharmaClik Rx allowing users to scan a bottle/pack's UPC prior to packaging a medication; this reinforces patient safety by preventing wrong drug dispensing errors.
A new tab called Package has been added to Rx Detail where you can perform the Scan Verify (UPC validation) step for all prescriptions with a workflow status of Waiting for Packaging. To learn more, see Packaging the Prescription – Scan Verify and Package Tab in Rx Detail.
Skipping UPC Validation
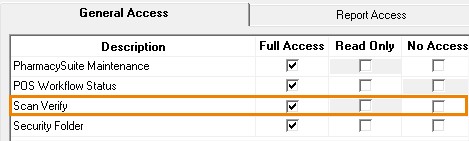
In some instances, you may need to skip the UPC validation (e.g. bottle's barcode is partially ripped). PharmaClik Rx allows authorized users with full access to Scan Verify to skip the UPC scan. To learn more see, Skipping UPC Scan.
A new security setting has been added in the Security Administration Facility Window (More > Security) where you can assign either Full Access, Read Only, or No Access to Scan Verify. To learn more, see Modifying General or Report Access for a Specific User.
Waiting for Packaging Preference
The Package tab in Rx Detail is visible once the Waiting for Packaging setting has been turned on from the Workflow Status tab in Workflow Preferences (More > Pharmacy). For more information, see Workflow Status Preferences.
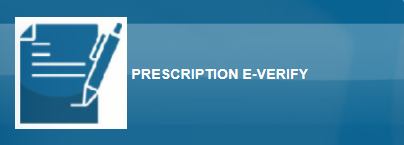
Prescription e-Verify
Patient Centre has added a new module called Prescription e-Verify (e-Verify). e-Verify enables pharmacists and registered pharmacy technicians to perform the technical check required for a prescription. It also allows pharmacists to perform the final clinical check using an electronic signature capture, eliminating the need to print prescription hard copies. To learn more, see Introduction to Prescription e-Verify.
To learn about each component in e-Verify, see the links below:
e-Verify Preferences
To activate the Prescription e-Verify module in Patient Centre, you must turn on the e-Verify setting from the Workflow Status tab in Workflow Preferences (More > Pharmacy). For more information, see Activating Prescription e-Verify.
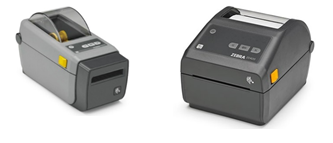
Thermal Printing
PharmaClik Rx has now integrated thermal printers. Thermal printing generates labels as they are needed throughout the workflow process (Pro Workflow). Thermal printing reduces expenses and waste related to consumables and paper shredding – only print what you need, when you need it.
If you are using thermal printers in the Pro Workflow, PharmaClik Rx will:
-
Print vial copies after the barcode is verified.
-
Print the official receipt, medication record and privacy receipt after the technical validation and clinical review are complete.
To learn more, see Thermal Printing Overview.
Thermal Label Preferences
You can customize thermal labels such as the vial copy and receipt layout or whether the user should be prompted to print the medication record from the Thermal Label Preferences (More > Pharmacy > Rx Detail). To learn more, see Thermal Label Preferences.
Digital Hardcopy and Dialogue
With the Pro Workflow, a digital hardcopy and a link to the completed dialogue in Prescription e-Verify will now be saved to each prescription.
To learn more about viewing the digital hardcopy, see Viewing Digital Hardcopy for a Completed Prescription .
To learn more about viewing completed dialogue, see Viewing Dialogue for a Completed Prescription .
General Fixes and Enhancements
Fixed: Central Fill sites not seeing correct inventory for DINs that may not exist at their site from satellite locations.
Fixed: The ScriptPro device not printing Drug Form and Rx Expiry on vial labels.
Fixed: Auto-dispensing device not resetting for Autofill prescriptions.
Fixed: When sending ADI PacMed/SynMed to Central Fill locations, files are received but not deleted at the source location (satellite locations).
Fixed: Some prescriptions in ADI not processing due to missing Supplier row in some drug folders.
Fixed: When the Name field is blank in Pharmacy preferences (More > Pharmacy), prescriptions in ADI are not moving from Pending to Process tab.
Fixed: Rebilling a satellite ADI prescription removes the uploaded record from the Processed tab (in PharmaClik Rx Automated Dispensing Interface window).
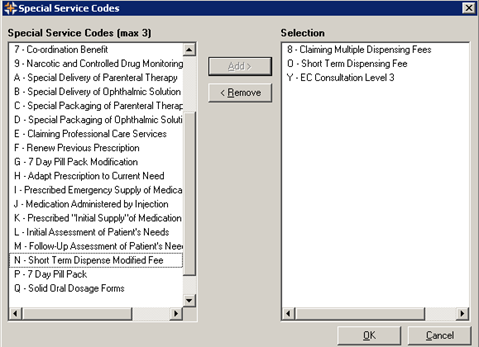
Enhancement: The Special Services field in the Third Party tab (Rx Detail) is enhanced to now select and submit a maximum of three (3) special service codes:
- The Special Services field is no longer a dropdown and has a new Expand icon.
- Selecting the Expand icon opens the new Special Services Codes window.
- The Special Services Codes window allows you to select and add a maximum of three (3) service codes.
- Once you have selected the special services codes to submit, the codes (e.g. 7, C, E) will display in the Special Services field.